 Paul
Paul
If you've decided to start building with Claude Code and you're staring at instructions full of terminal commands wondering where to even begin, this guide is for you. It walks through installing Claude Code from scratch on Windows, macOS, and Linux, covers the option that skips the terminal entirely if that's less intimidating, and explains the few things that trip up beginners so you don't lose an afternoon to a confusing error. The whole process takes a few minutes once you know what you're doing, and the goal here is to get you from nothing to a working setup without assuming you already know your way around a command line.
One thing to know before you start, because it saves frustration later: Claude Code requires a paid Claude plan. The free Claude.ai plan does not include access to Claude Code, so you'll need a Pro, Max, Team, or Enterprise subscription, or a Console account if you want to pay per use through the API. If you don't have one of those yet, set that up first, because the install will work but you won't be able to actually log in and use the tool without a qualifying plan.
The easiest option: the desktop app (no terminal needed)
Before getting into terminal installs, it's worth knowing that you don't strictly need the terminal at all. Anthropic offers a Claude Code desktop app for both macOS and Windows, which gives you a graphical interface to use Claude Code without typing any commands. If the terminal feels intimidating and you just want to start building, the desktop app is the lowest-friction way in, and you can always move to the terminal version later once you're comfortable.
To get it, go to Anthropic's site and download the desktop app for your operating system, then install it the same way you'd install any other app, by opening the downloaded file and following the prompts. Once it's installed and you log in with your Claude account, you're ready to go. For a lot of beginners, especially non-developers who are building with Claude Code rather than writing code by hand, the desktop app is genuinely the right starting point and there's no shame in skipping the terminal entirely.
That said, the terminal version is what most developers end up using because it fits naturally into a coding workflow, so the rest of this guide covers the terminal install for each platform. If you went with the desktop app, you can skip ahead to the section on verifying everything works and logging in.
Installing on macOS
On a Mac, you'll use the Terminal app, which comes built in. You can find it by pressing Command and Space to open Spotlight, typing "Terminal," and hitting enter. A window with a text prompt will open, and that's where you'll paste the install command.
The recommended way to install Claude Code is the native installer, which is the method Anthropic recommends and which does not require you to install Node.js or any other dependencies first. Paste this command into Terminal and press enter:
curl -fsSL https://claude.ai/install.sh | bash
The command downloads the Claude Code binary, puts it in the right place on your system, and sets it up to keep itself updated automatically in the background, which means you won't have to manually update it later. The whole thing takes well under a minute. If you'd prefer to install it through Homebrew, which many Mac developers already use as their package manager, you can instead run this:
brew install --cask claude-code
The one difference worth knowing is that the Homebrew version does not auto-update, so you'd need to run a manual upgrade command occasionally to stay current, whereas the native installer keeps itself up to date on its own. For most beginners, the native installer is the simpler choice for exactly that reason.
Installing on Windows
Windows has a small wrinkle that trips up beginners, which is that there are two different terminal programs and the install command is different depending on which one you're in. The two are PowerShell and Command Prompt (also called CMD), and they look similar but want different commands. The quickest way to tell them apart is to look at the prompt: PowerShell shows something starting with "PS" like PS C:\Users\YourName>, while Command Prompt shows the same thing without the "PS" at the front.
For most people on Windows, PowerShell is the one to use, and you can open it by clicking the Start menu, typing "PowerShell," and clicking it. Once it's open, paste this command and press enter:
irm https://claude.ai/install.ps1 | iex
If you happen to be in Command Prompt instead of PowerShell, the command is different, and you'd use this one:
curl -fsSL https://claude.ai/install.cmd -o install.cmd && install.cmd && del install.cmd
A quick way to know if you're in the wrong terminal: if you try the PowerShell command in Command Prompt, you'll see an error saying "irm is not recognized," and if you try the CMD command in PowerShell, you'll see an error about the "&&" symbol not being a valid statement separator. If either of those happens, you're just in the other terminal, so switch and use the matching command.
There's also a third option on Windows worth mentioning. If you already use WinGet, Windows' built-in package manager, you can install with winget install Anthropic.ClaudeCode, though like Homebrew on Mac, the WinGet version requires manual updates rather than updating itself.
One optional but recommended extra step on Windows: installing Git for Windows. You don't strictly need it, but having it installed lets Claude Code use a fuller set of tools when working on your projects, so if you plan to do real development it's worth grabbing from the Git website. Without it, Claude Code still works, it just uses PowerShell for running commands instead of the Bash environment that Git for Windows provides.
Installing on Linux
On Linux, the native installer works the same way it does on macOS. Open your terminal and run:
curl -fsSL https://claude.ai/install.sh | bash
This is the simplest path and it works across the common distributions. If you prefer to install through your system's package manager, Claude Code also publishes proper apt, dnf, and apk repositories for Debian and Ubuntu, Fedora and RHEL, and Alpine respectively, which some people prefer because it fits their normal system update workflow. Those package manager installs don't auto-update through Claude Code itself, so updates come through your usual system upgrade process instead.
If you're running Claude Code on Windows through WSL, which is the Windows Subsystem for Linux, you'd use this same Linux install command from inside your WSL terminal rather than installing from PowerShell or CMD. The rule there is that you install and run Claude Code inside WSL, not from the Windows side.
The npm method, and why it's no longer the default
If you've seen older guides, you may have run across instructions to install Claude Code through npm, the Node.js package manager, with a command like npm install -g @anthropic-ai/claude-code. This method still works and is fully supported, but it's no longer the recommended default, because it requires you to have Node.js version 18 or newer installed first, and the native installer avoids that dependency entirely. For a beginner, the native installer is almost always the better choice precisely because it's one less thing to install and one less thing to go wrong.
If you do go the npm route, there's one rule that matters more than any other: never use sudo with the npm install command. Running sudo npm install -g is a common beginner instinct when you hit a permission error, but it causes permission and security problems down the line, and the correct fix for permission errors is to set up npm to install into your home directory rather than running it as the system administrator. If you're hitting permission errors with npm, that's honestly a good sign you should just use the native installer instead, which sidesteps the whole issue.
Verifying it worked and logging in
Once the install finishes, you'll want to confirm everything is set up correctly. In your terminal, run:
claude --version
If this prints a version number, the install worked. If instead you see "command not found" or a similar error, the most common cause is that your terminal hasn't picked up the new installation yet, and the fix is usually as simple as closing your terminal window completely and opening a fresh one, then trying again. For a more thorough check of your setup, there's a built-in diagnostic command:
claude doctor
This checks your installation and configuration and tells you about anything that looks off, which makes it the first thing to run if something isn't behaving the way you expect. Once you've confirmed the install is good, you start Claude Code by navigating in your terminal to the folder of the project you want to work on and simply running:
claude
The first time you do this, Claude Code will walk you through logging in, which happens through your web browser. You log in with the Claude account tied to your paid plan, approve the access, and you're connected. From that point on, you're ready to start actually building, and the tool remembers your login so you won't have to do this every time.
A few things beginners should know after install
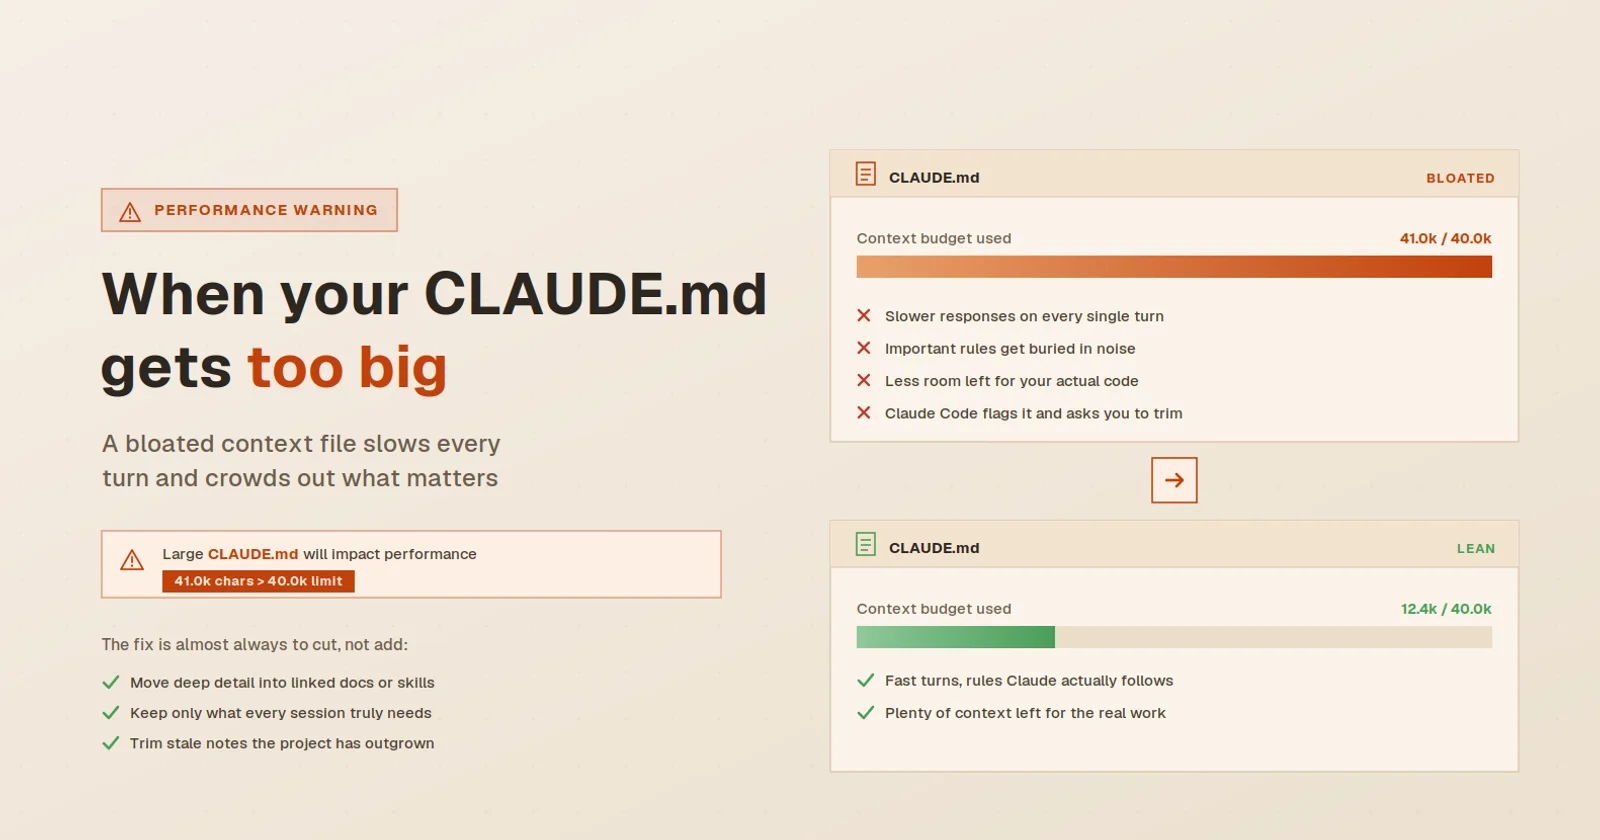
Once you're up and running, there are a couple of things worth knowing that the bare install instructions tend to skip. The first is that Claude Code works best when your project has a CLAUDE.md file, which is a plain text file in your project that tells Claude about your project's structure, conventions, and anything else it should know. You don't need one to start, but creating one early makes a real difference in how well Claude understands your project, and it's worth learning about once you've gotten comfortable with the basics.
The second is that Claude Code is a genuinely different tool from the regular Claude chat interface, and knowing which one to reach for matters more than beginners expect, since they're built for different kinds of work. If you find yourself unsure whether a given task belongs in Claude Code or in the chat interface, that's a normal question to have early on, and it's worth understanding the distinction so you don't end up forcing everything through one tool when the other would be faster.
The third is that the tool keeps itself updated automatically if you used the native installer, so you generally don't have to think about staying current. If you used Homebrew, WinGet, or a Linux package manager, you'll need to update manually now and then, but the native installer handles it for you in the background, which is one more reason it's the recommended path for people who just want things to work without fuss.
That's the whole install. Once you've got claude running in a project folder and you've logged in, you're past the setup hurdle and into the actually fun part, which is building things. The install is genuinely the hardest part of getting started for most beginners, and once it's behind you, the learning curve from there is about how to work with the tool rather than how to get it running at all.